Users
Learn how to manage users in the SiteBox DashboardManage users at the Company level
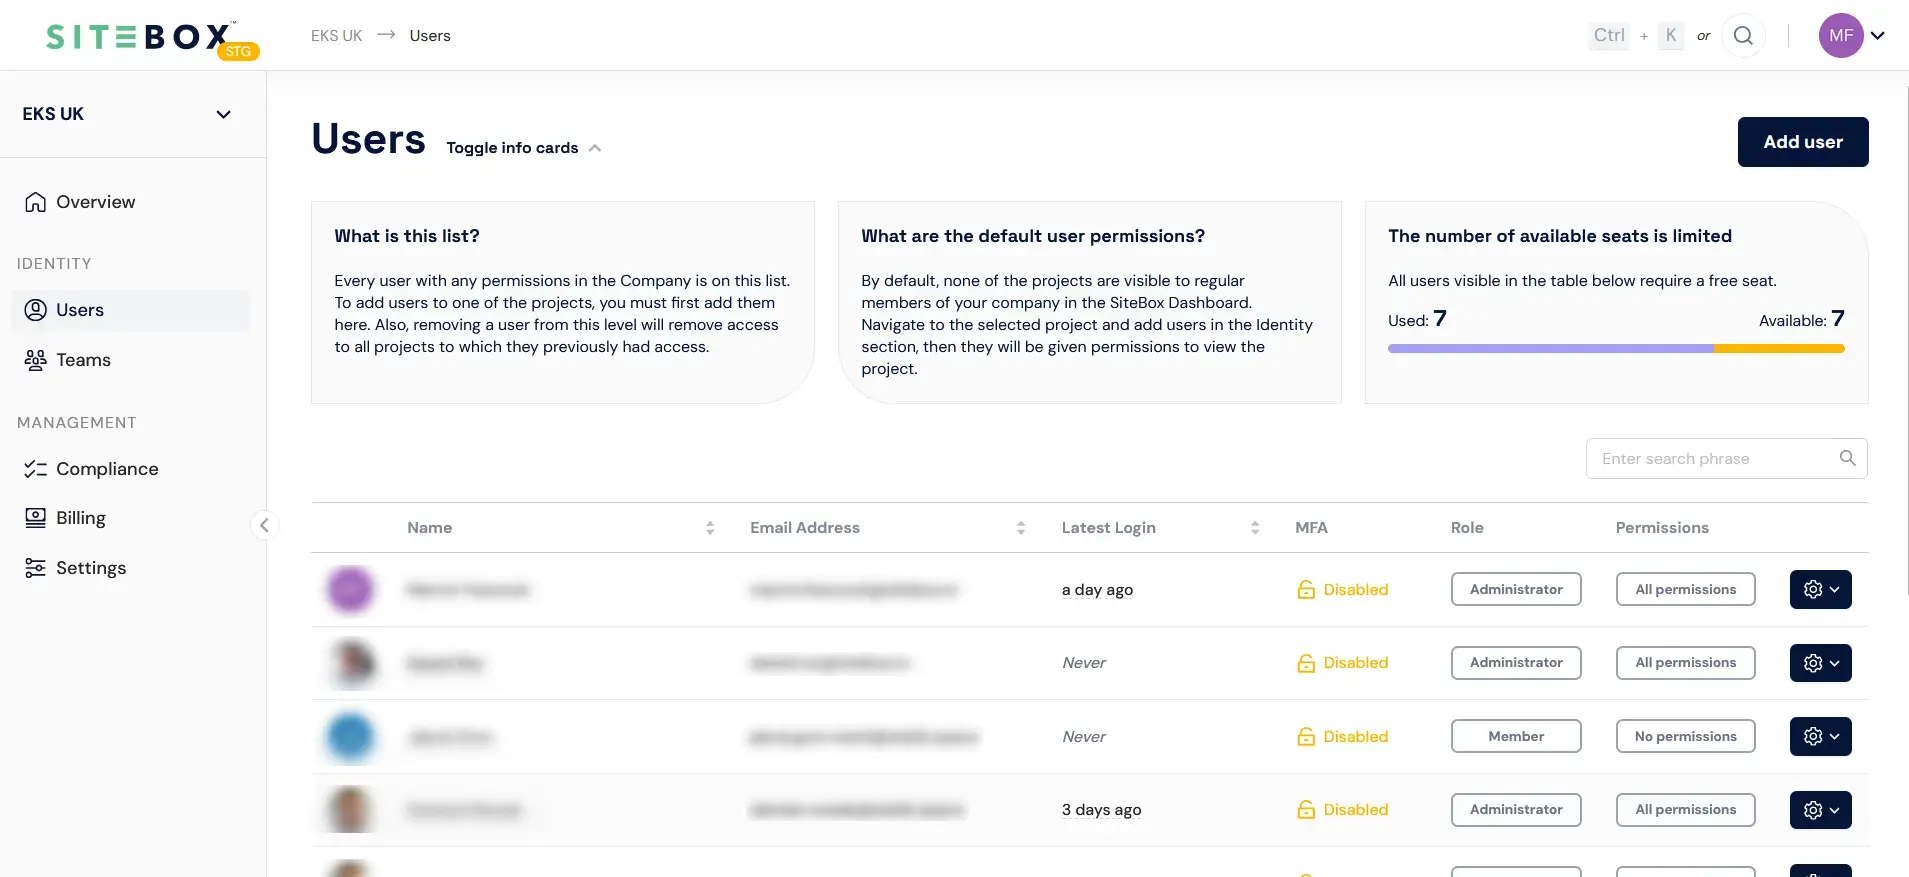
User Management at the company level is the starting point for organizing and controlling access to your SiteBox Dashboard. Here, you can:
- List company users – view a comprehensive list of all users associated with your organization.
- Add users – add new users to your company with specific permissions, granting them access to your organization.
- Check user seats (capacity) – it's essential to keep an eye on your company's user capacity within SiteBox Dashboard. Monitoring this limit helps ensure that you can efficiently manage and accommodate new users as your organization grows.
- Remove users – Remove existing users from your company, revoking their access to your organization.
- Edit user permission – Edit existing users permissions to control access to your organization's resources.
How to add a user to the Company?
To add a user to your company within the SiteBox Dashboard, follow these steps:
-
Begin by clicking on the "Add user" button found in the "Users" tab.
-
This action will trigger a modal window to appear, presenting a user information form that includes fields for "First Name", "Last Name", and an email address
-
After completing the user information form, proceed to the next step by clicking on the "Proceed to permissions" button.
-
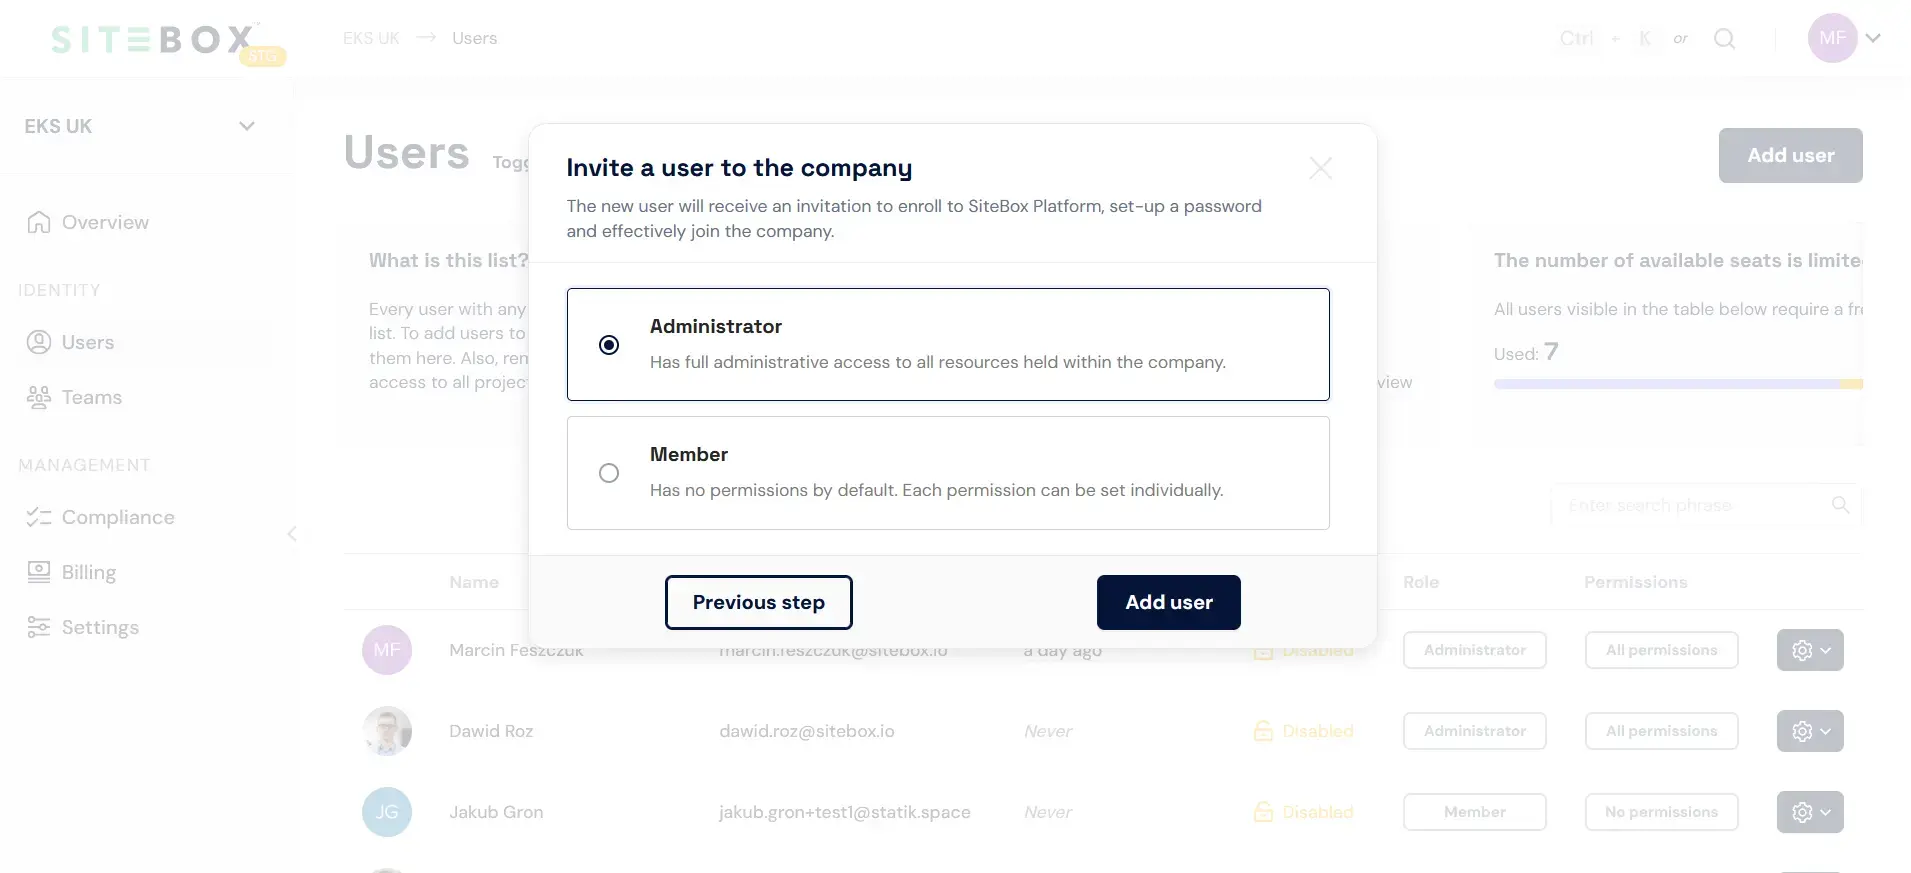
In the subsequent step, you will need to select the user's role:
- Administrator – this role grants full administrative access to all resources within the company.
- Member – by default, members have no permissions.
-
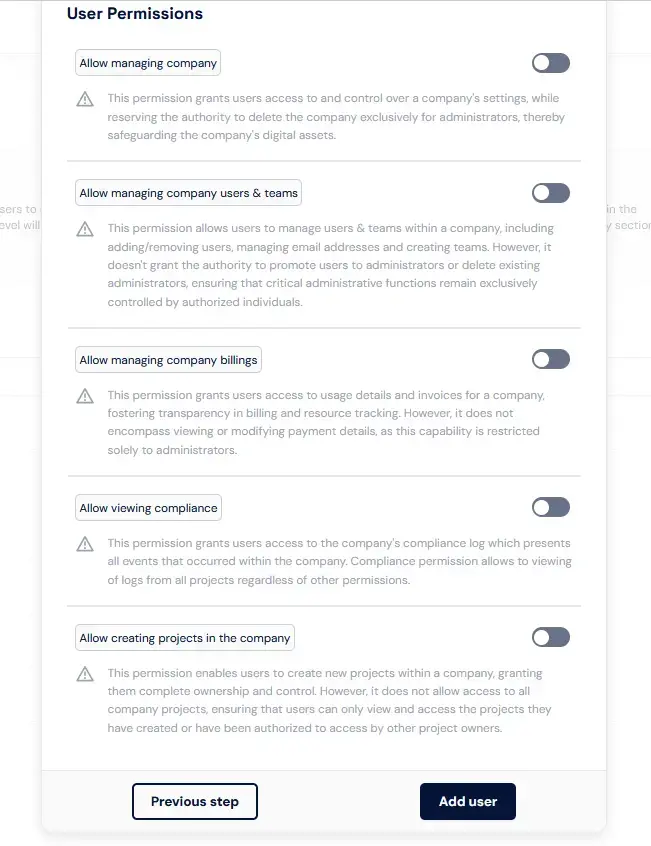
If you choose the "Administrator" role, the user will gain access to all company resources. Alternatively, if you select the "Member" role, additional options will become available in the "User Permissions" section.
-
To finalize the process, click the "Add user" button.
The newly added user will promptly receive an invitation to join the SiteBox Platform, enabling them to set up a password and become a valuable part of the SiteBox community.
How to edit the user's Company permissions?
This process allows you to easily adjust the permissions of a user within the SiteBox Dashboard. To edit permissions, follow these steps:
-
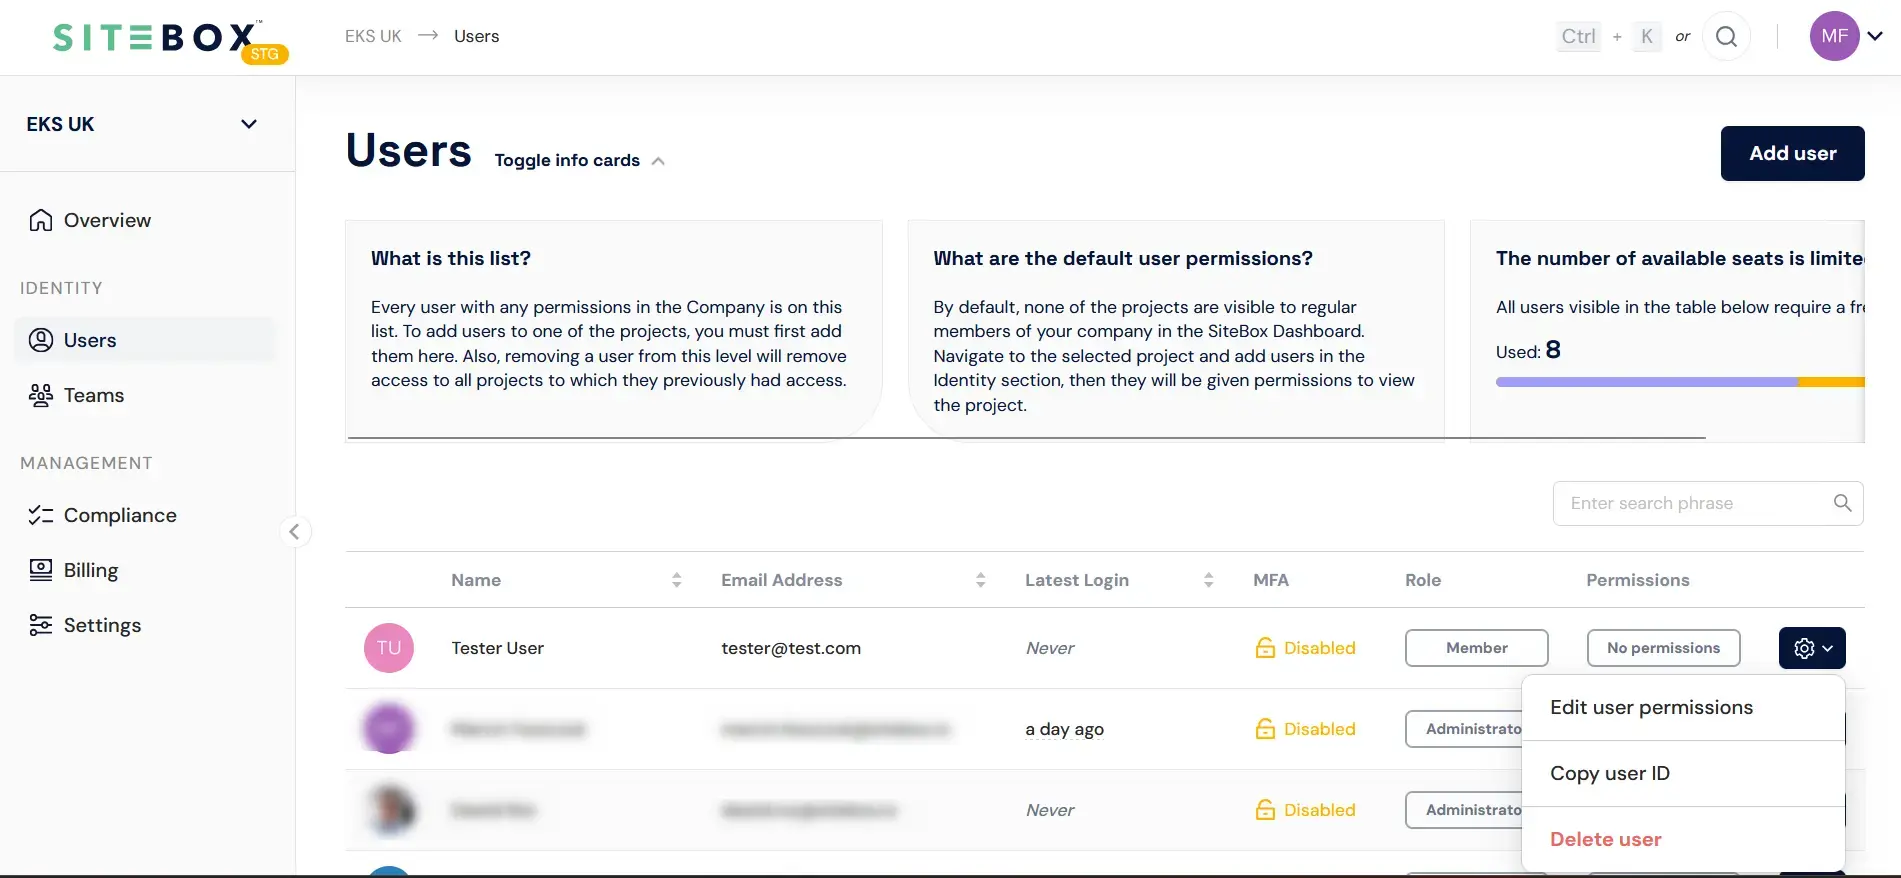
Hover your mouse over the gear-shaped icon next to the user whose permissions you want to modify.
-
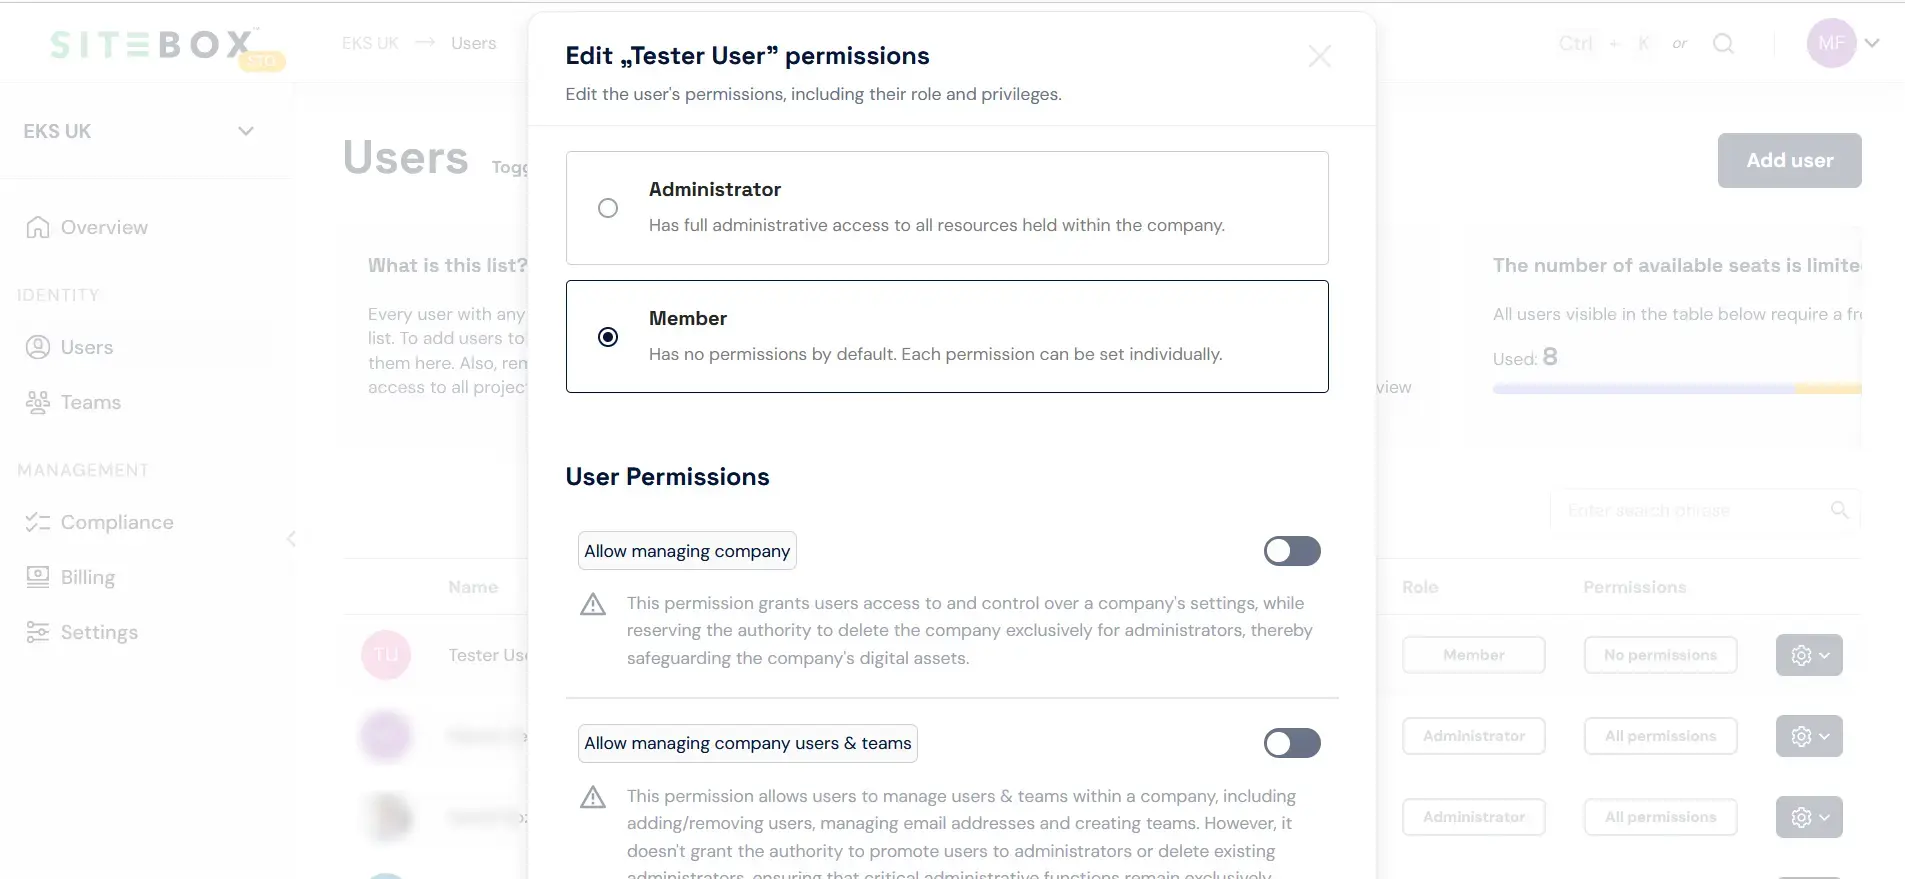
Then, click on "Edit user permissions". A modal window will appear, similar to the one used for creating a user. Here, you can select the user's role, just as you did when creating a user.
-
Finally, click "Update user" to save the changes.
How to remove the user from the Company?
This process allows you to easily and securely remove a user from the SiteBox Dashboard. To remove a user, follow these steps:
-
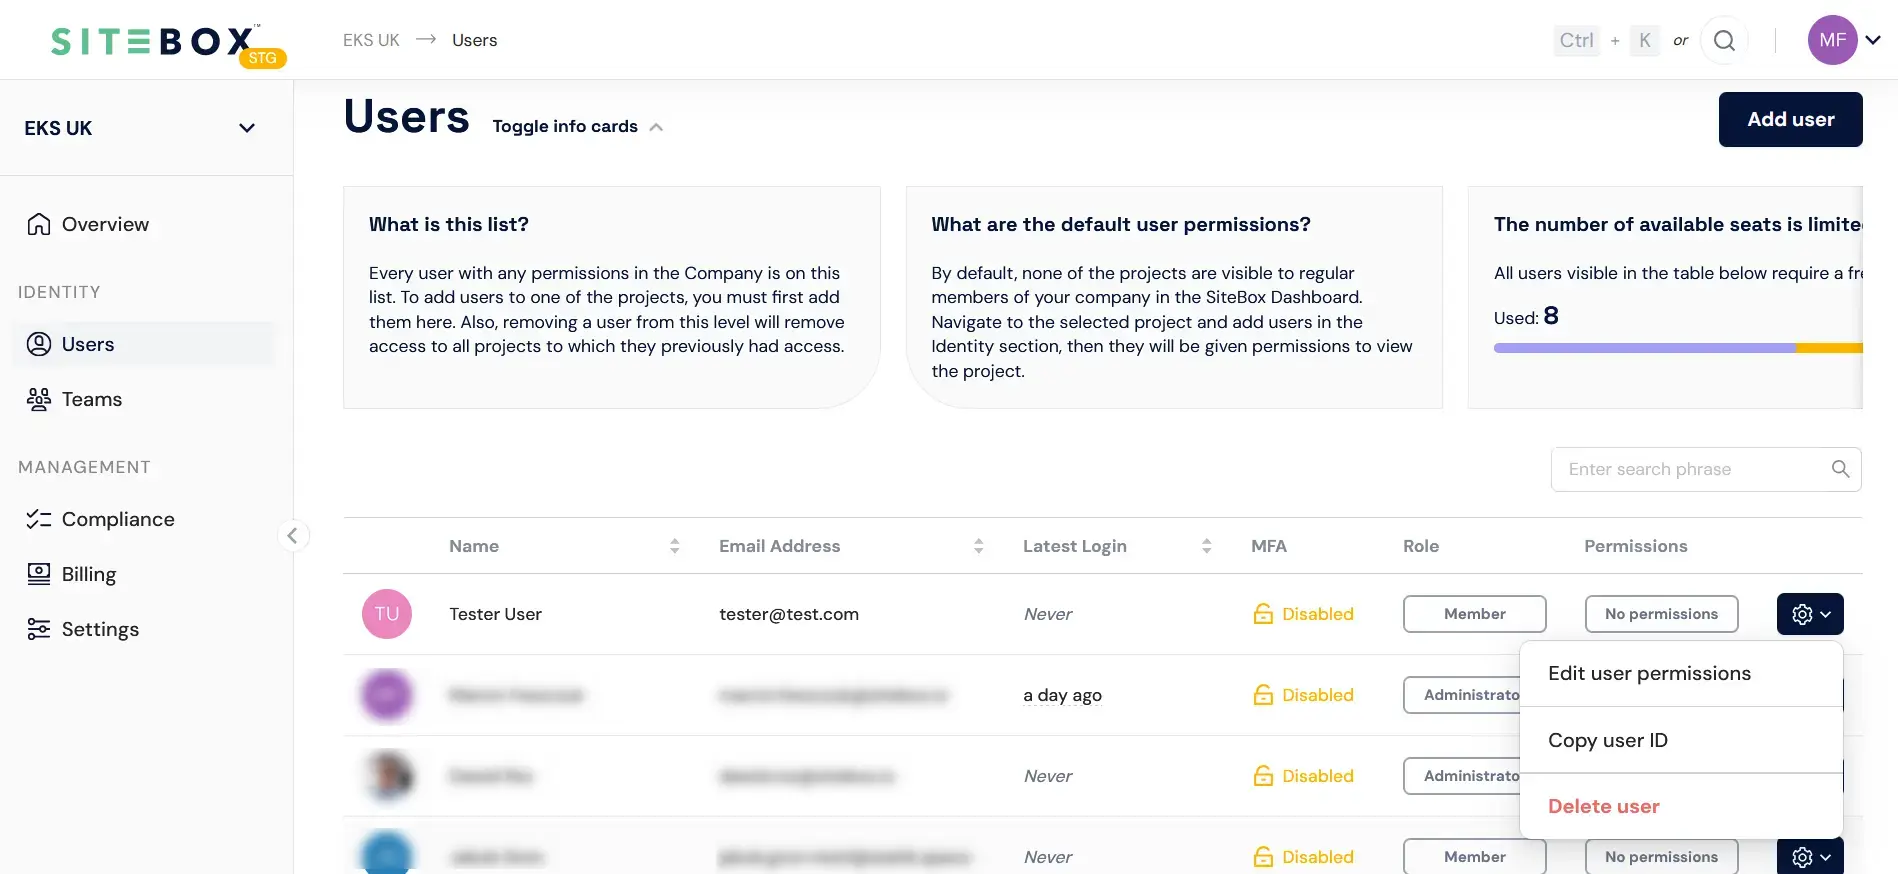
Hover your mouse over the gear-shaped icon next to the user you wish to remove.
-
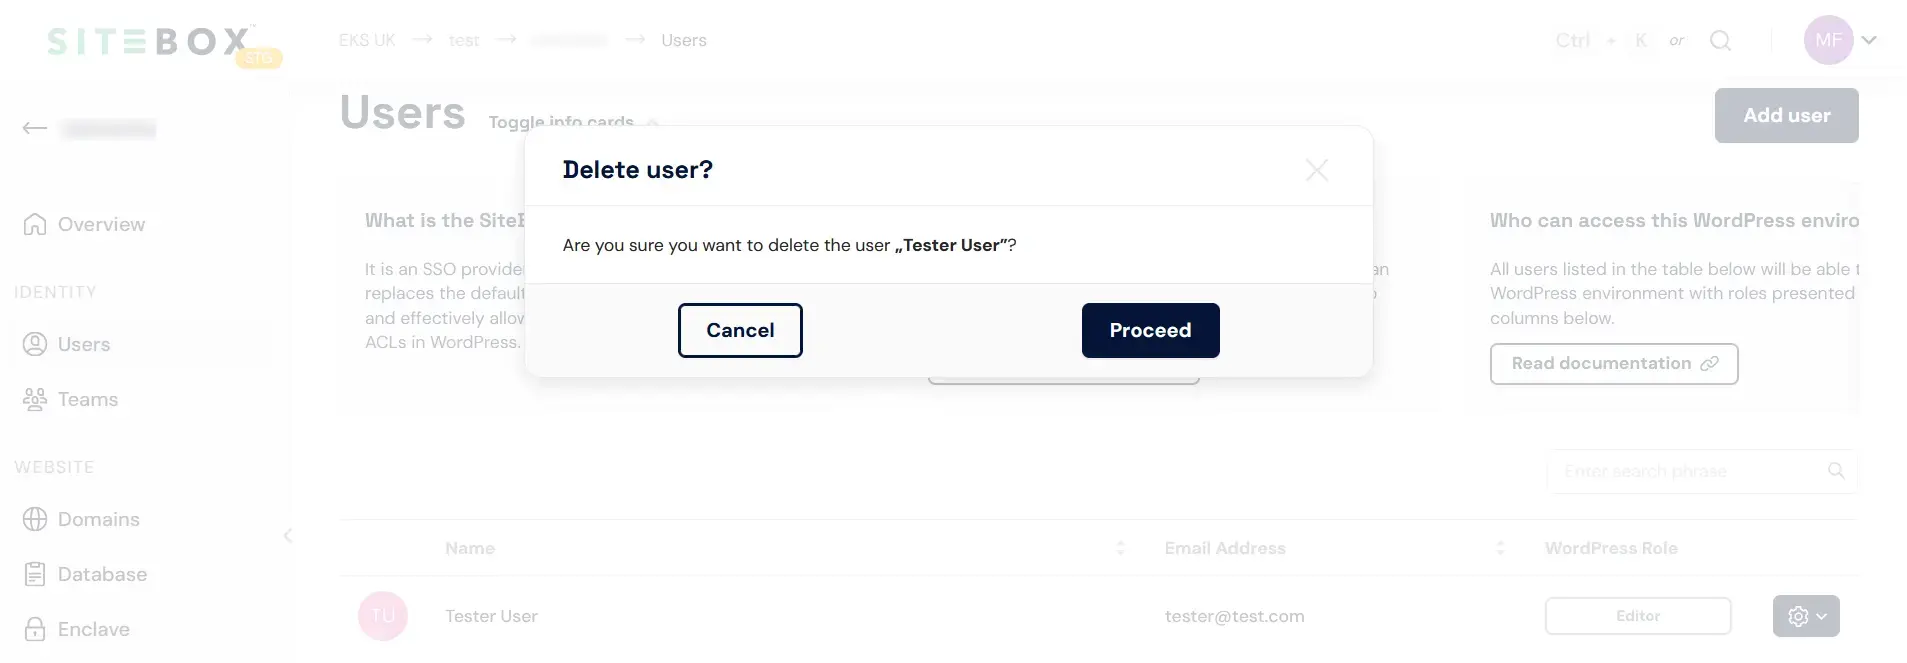
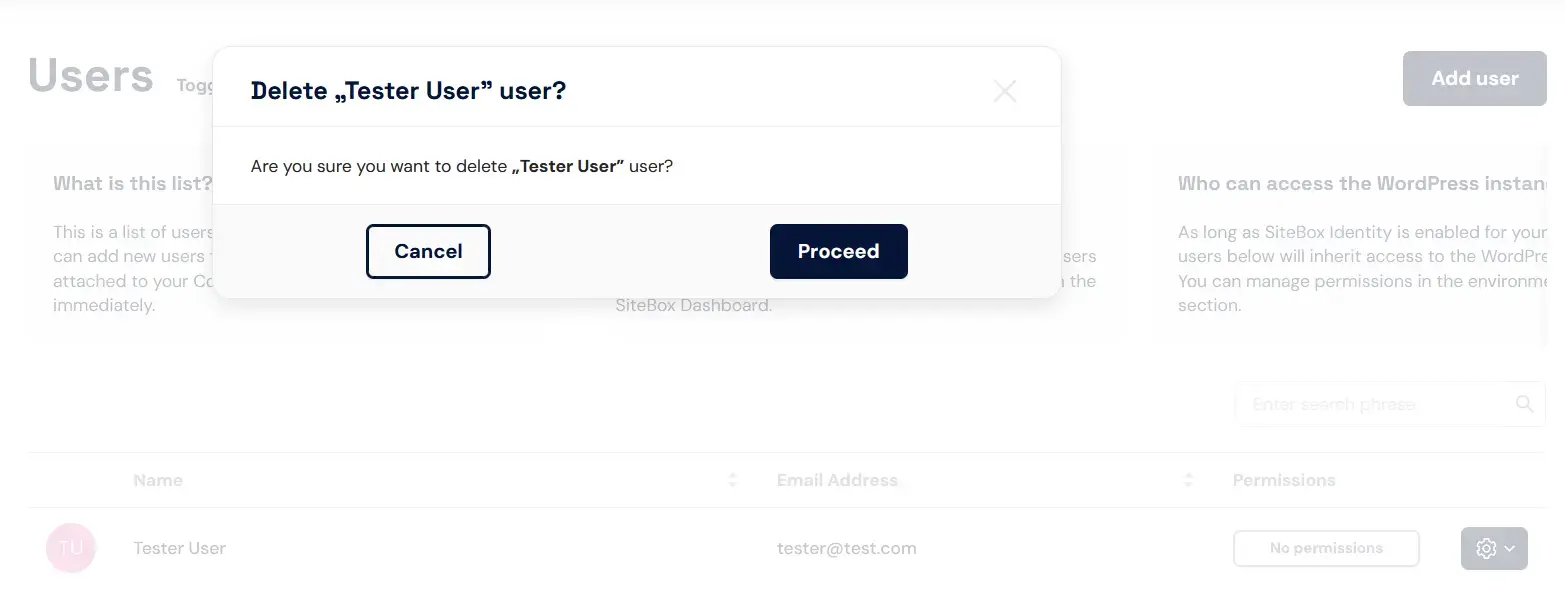
Click on "Delete user". A popover will appear, asking you to confirm the user's removal.
-
To confirm the removal, click the "Proceed" button.
Manage users at the Project level
In the project level, User Management focuses on tailoring access to specific projects. Here's what you can do:
- List project users – view and manage users specifically associated with a particular project.
- Add project users – add users to the project's user list, giving them access to project-related resources.
- Visibility control – control project visibility—by default, projects are not visible to regular company members in the SiteBox Dashboard.
- WordPress access – with SiteBox Identity enabled, grant users access to associated WordPress instances based on their roles.
How to add a user to the Project?
To add a user to your project within the SiteBox Dashboard, follow these steps:
-
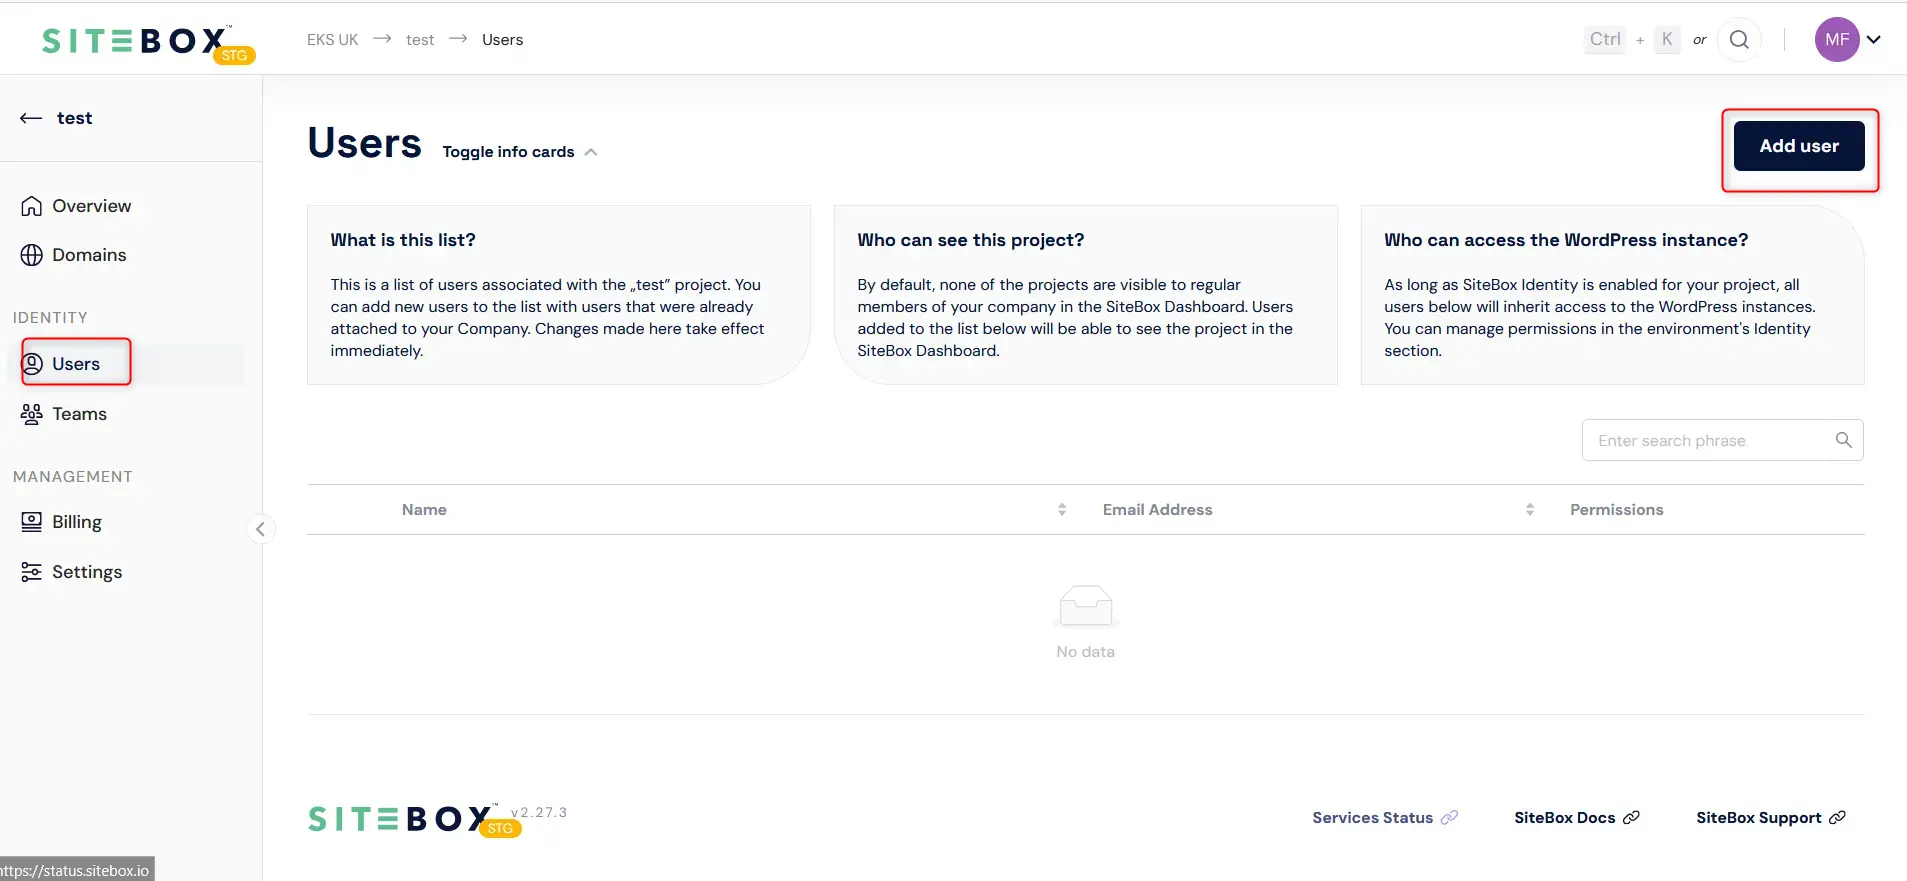
Begin by clicking on the "Add user" button found in the "Users" tab on the project level.
-
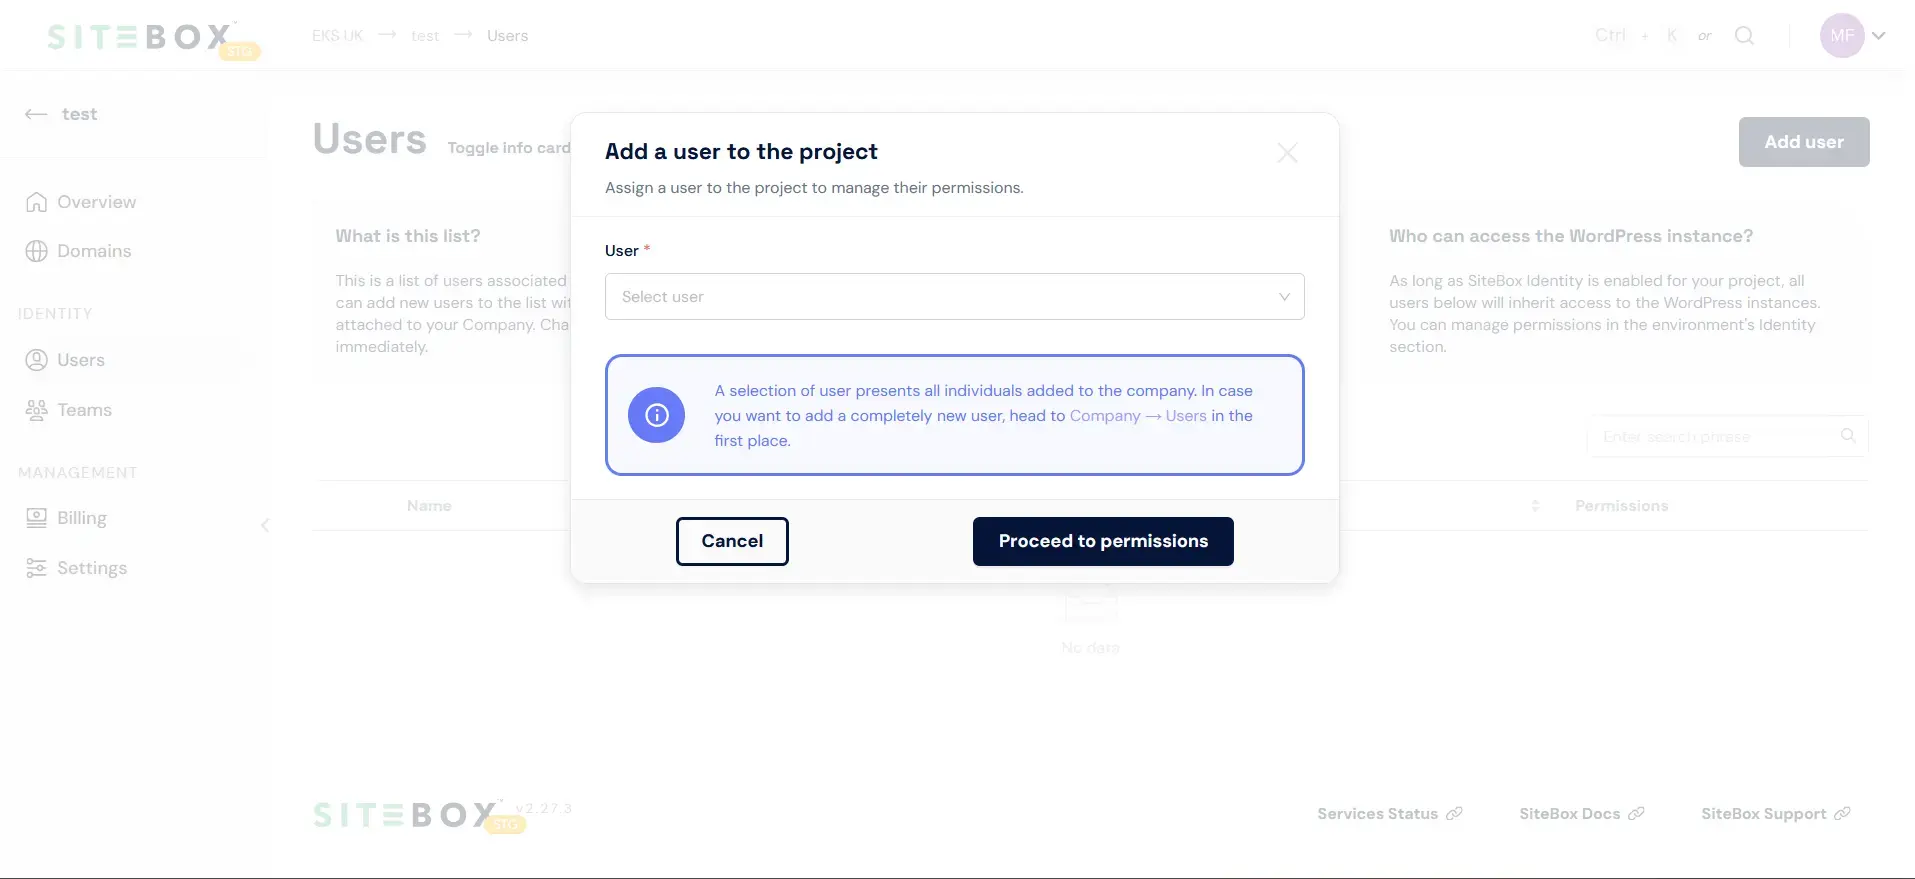
This action will trigger a modal window to appear, presenting a user dropdown menu that includes user assigned to your organization.
-
After selecting the user, proceed to the next step by clicking on the "Proceed to permissions" button.
-
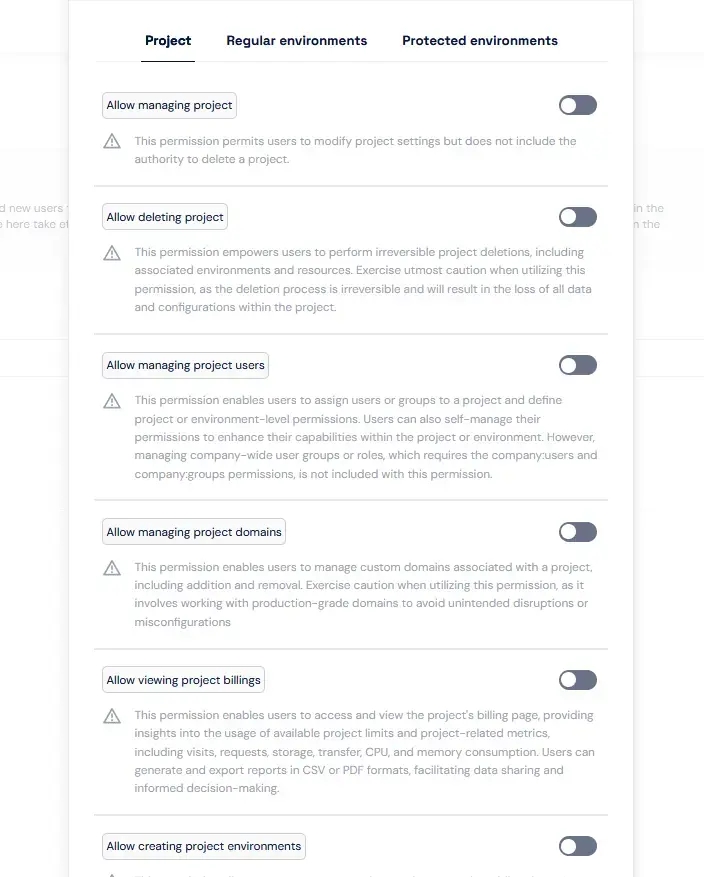
In the subsequent step, you can select user permissions for "Project", "Regular environments" and "Protected environments".
See also the user guide:
Permissions list
Be aware of the available permissions in the SiteBox ecosystem and what they are responsible for
-
To finalize the process, click the "Add user" button.
The newly added user will be added to your project.
How to edit the user's Project permissions?
This process allows you to easily adjust the permissions of a user within your project. To edit permissions, follow these steps:
-
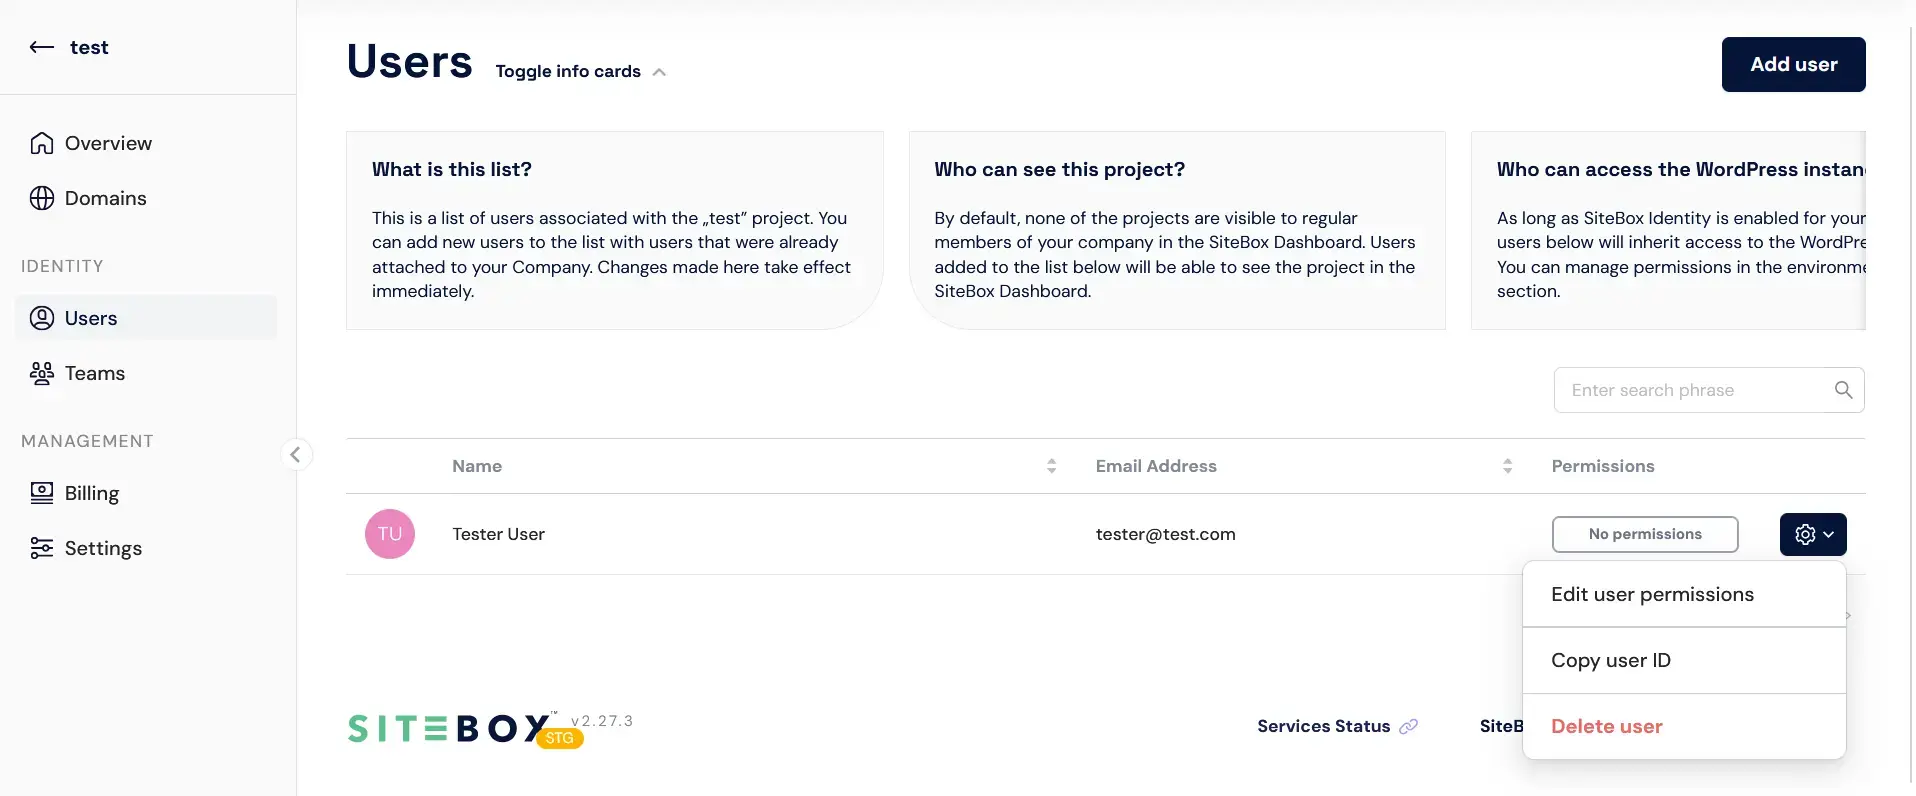
Hover your mouse over the gear-shaped icon next to the user whose permissions you want to modify.
-
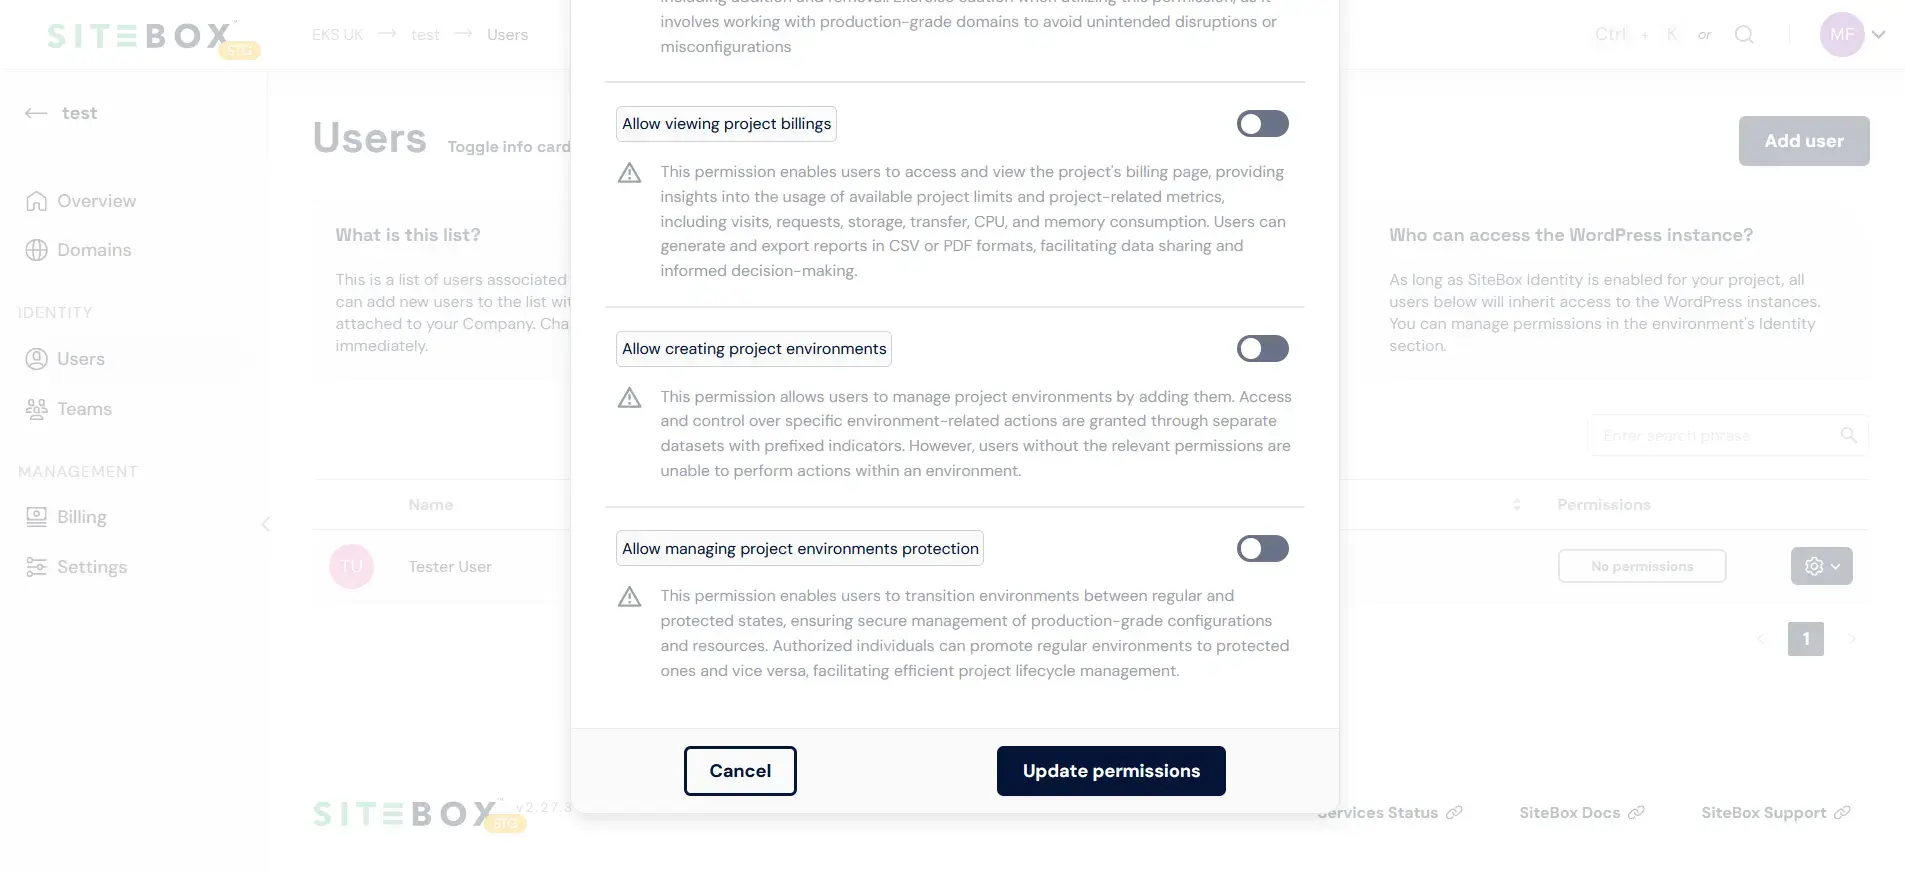
Then, click on "Edit user permissions". A modal window will appear, similar to the one used for adding a user. Here, you can choose permissions, you would like to assign to the user.
-
Finally, click "Update permissions" to save the changes.
How to remove the user from the Project?
This process allows you to easily and securely remove a user from your project. To remove a user, follow these steps:
-
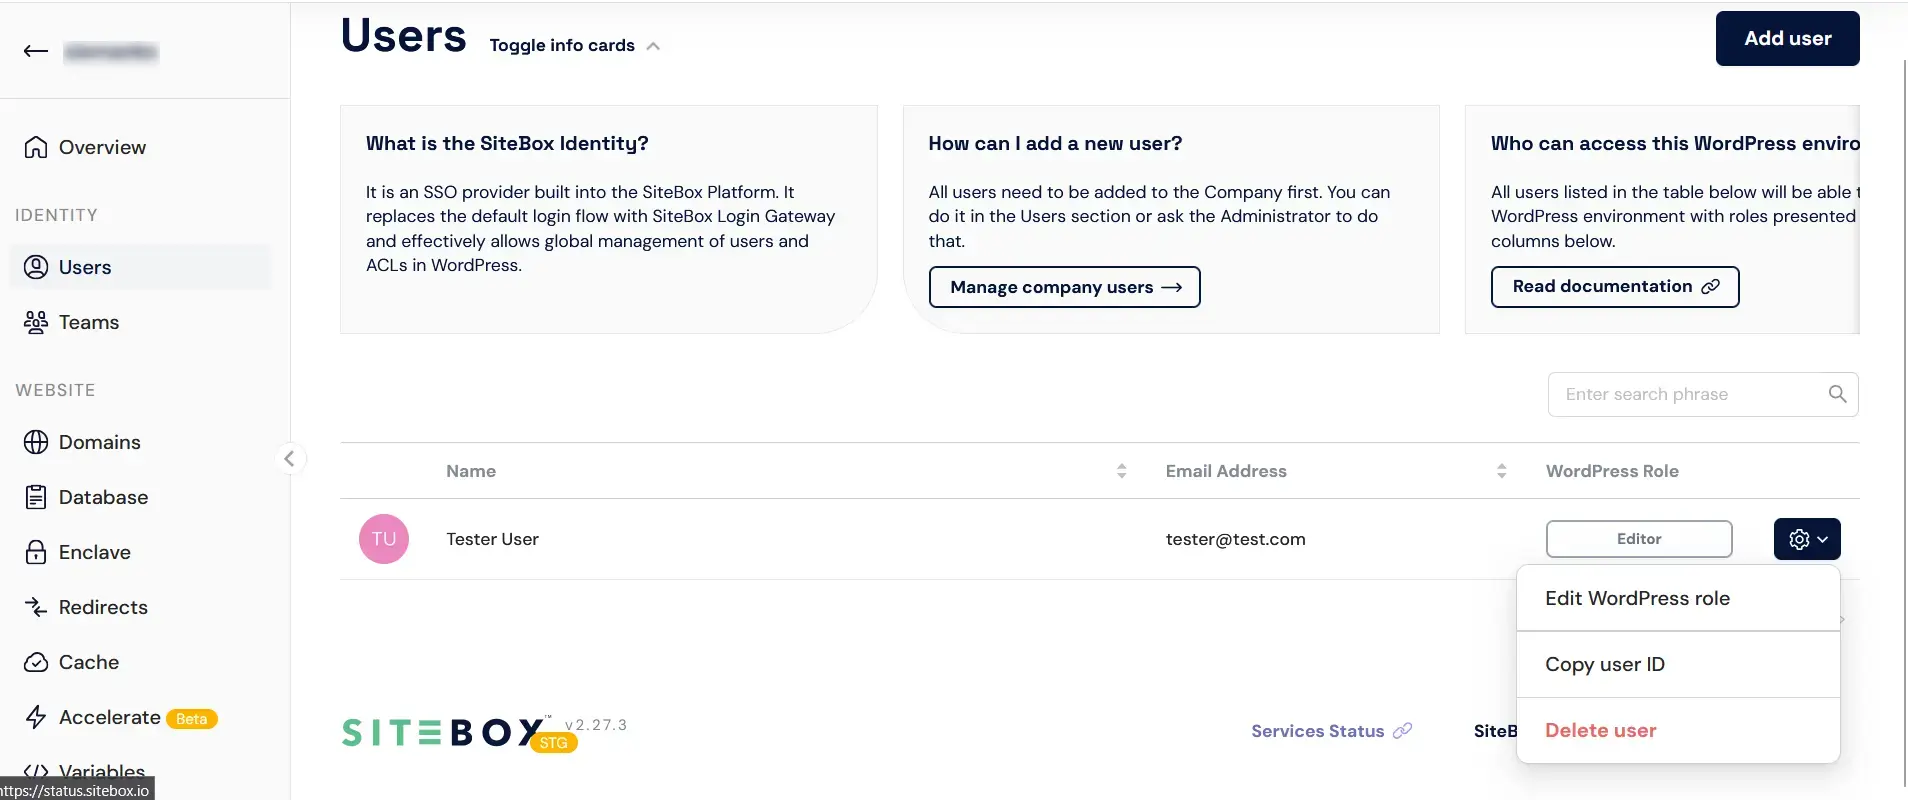
Hover your mouse over the gear-shaped icon next to the user you wish to remove.
-
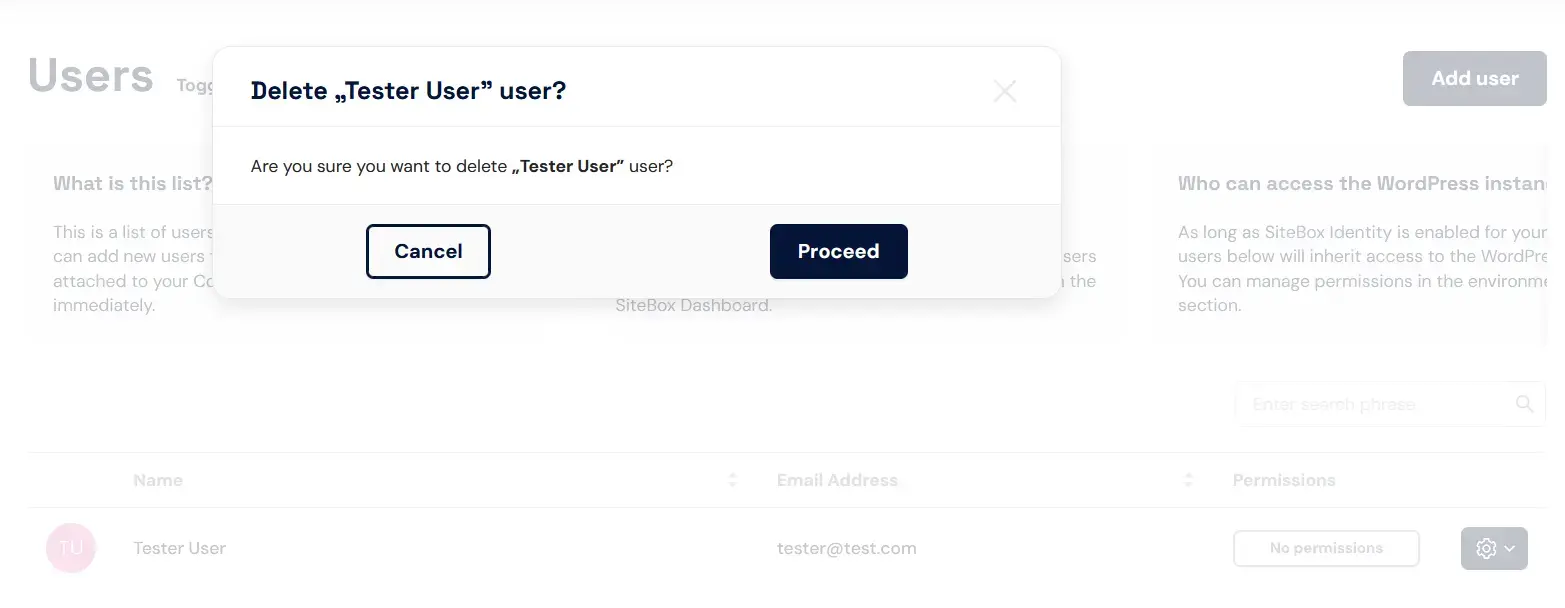
Click on "Delete user". A popover will appear, asking you to confirm the user's removal.
-
To confirm the removal, click the "Proceed" button.
Manage users at the Environment level
In the backend environment, User Management ties into the SiteBox Identity feature for secure access management. Here's what you can achieve:
- SiteBox Identity – learn about SiteBox Identity, the built-in Single Sign-On (SSO) provider, replacing the default login flow and enhancing user and access control.
- WordPress access control – Manage which users can log in to WordPress instances associated with the environment. User roles are determined here.
- Exclusive Login Flow – Note that, with SiteBox Identity enabled, the standard WordPress login flow is disabled, ensuring secure access management.
User Management across these scopes empowers you to tailor access, permissions, and roles to match your organization's needs, ensuring a secure, efficient, and streamlined user experience in the SiteBox Dashboard.
How to add a user to the Environment?
To add a user with WordPress role selection, follow these steps:
-
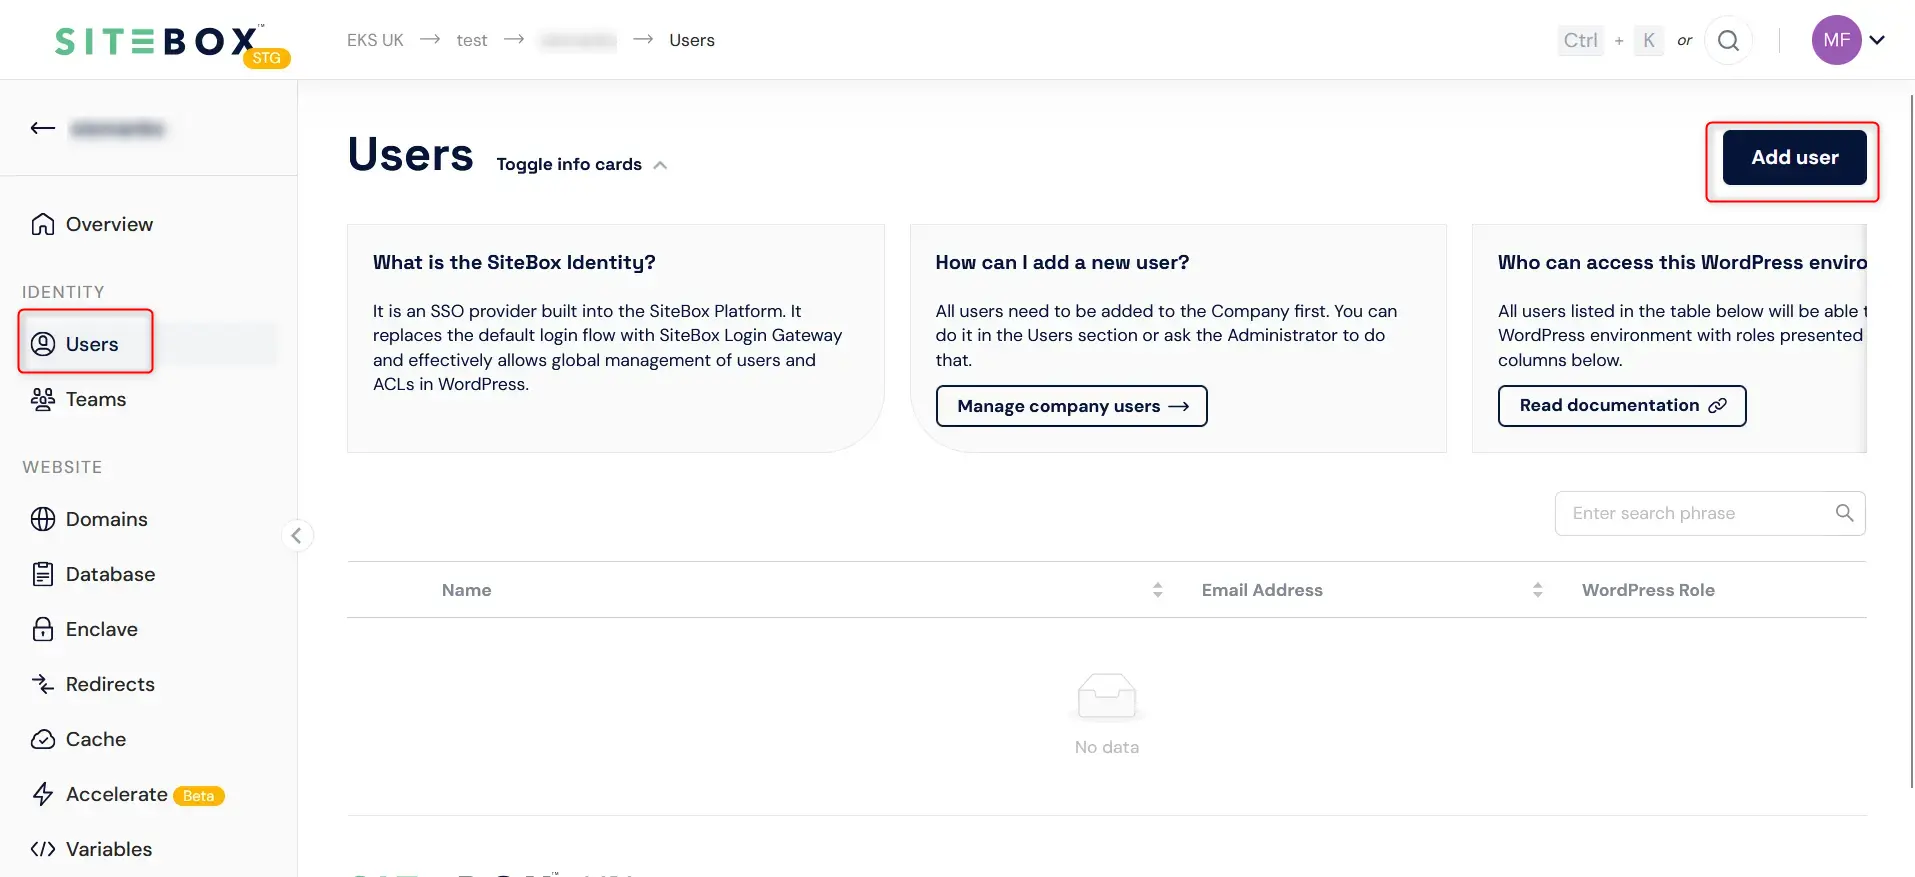
Begin by clicking on the "Add user" button found in the "Users" tab on the backend environment.
-
A modal window will appear, displaying two dropdown menus.
-
In the first dropdown menu, select the person you wish to add.
-
In the second dropdown menu, choose the WordPress role for the user: Super Admin, Administrator, Editor, Author, Contributor, or Subscriber.
-
Finally, click the "Add user" button to add the selected individual to the environment with the specified WordPress role.
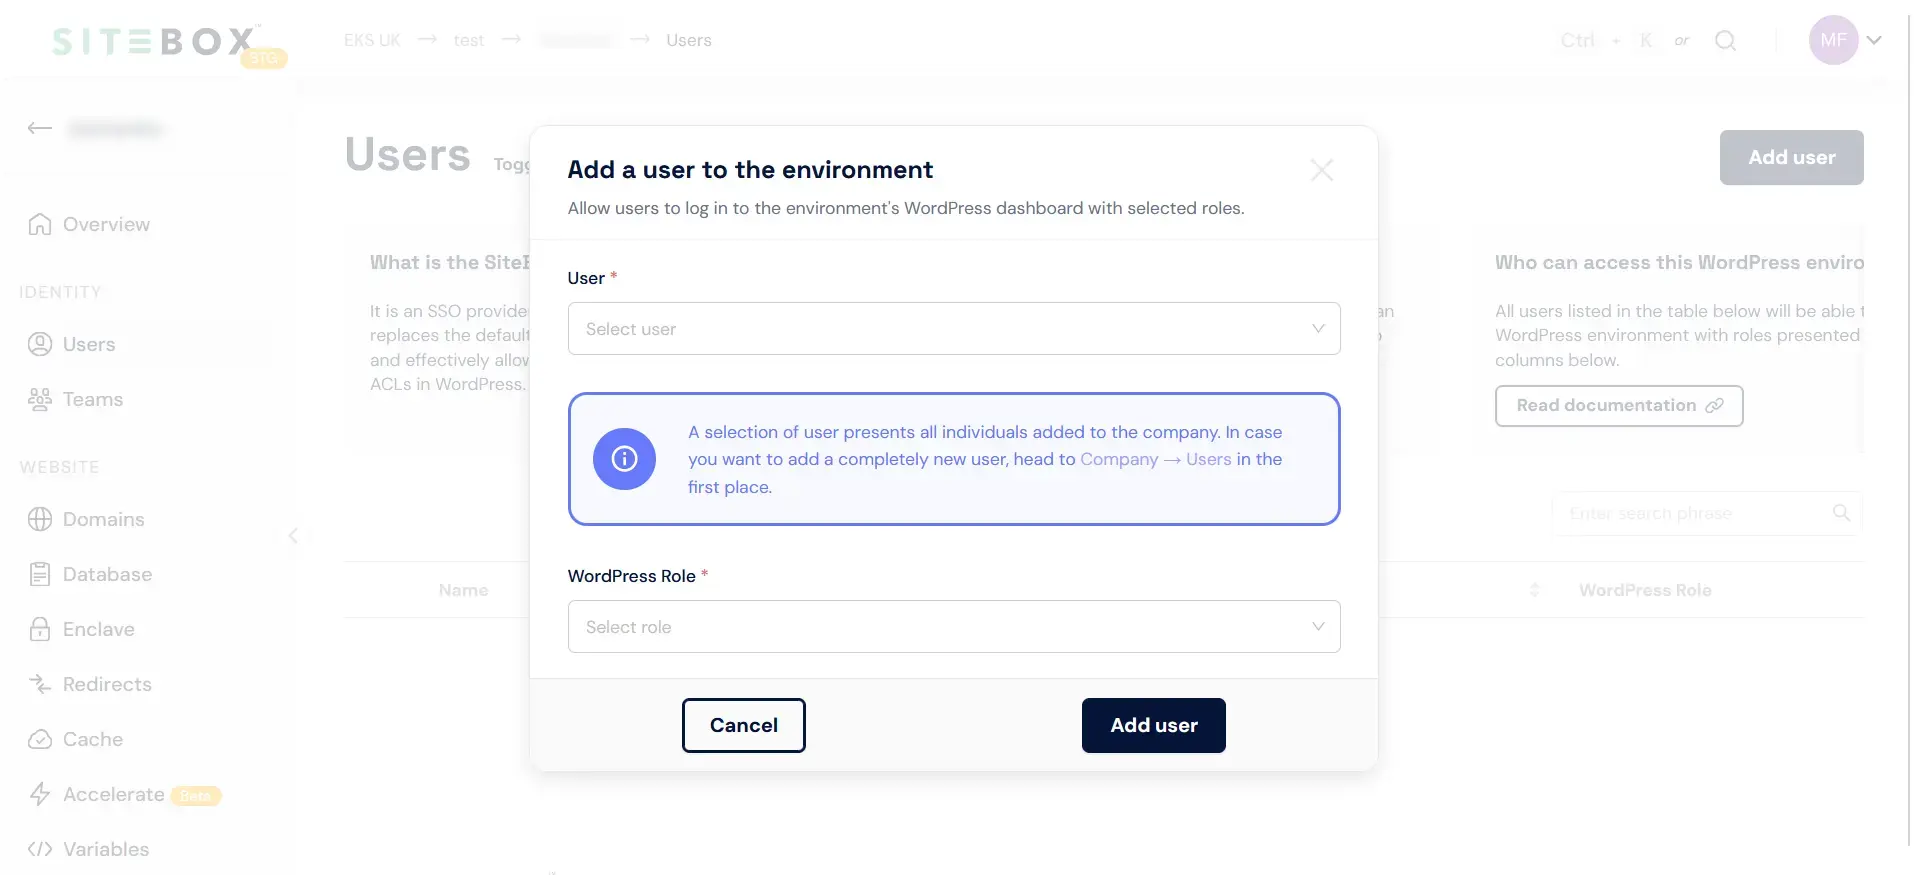
This process allows you to easily add users to the environment while specifying their WordPress roles within the WordPress instance.
How to edit user's WordPress role?
To edit a user's WordPress role, follow these steps:
-
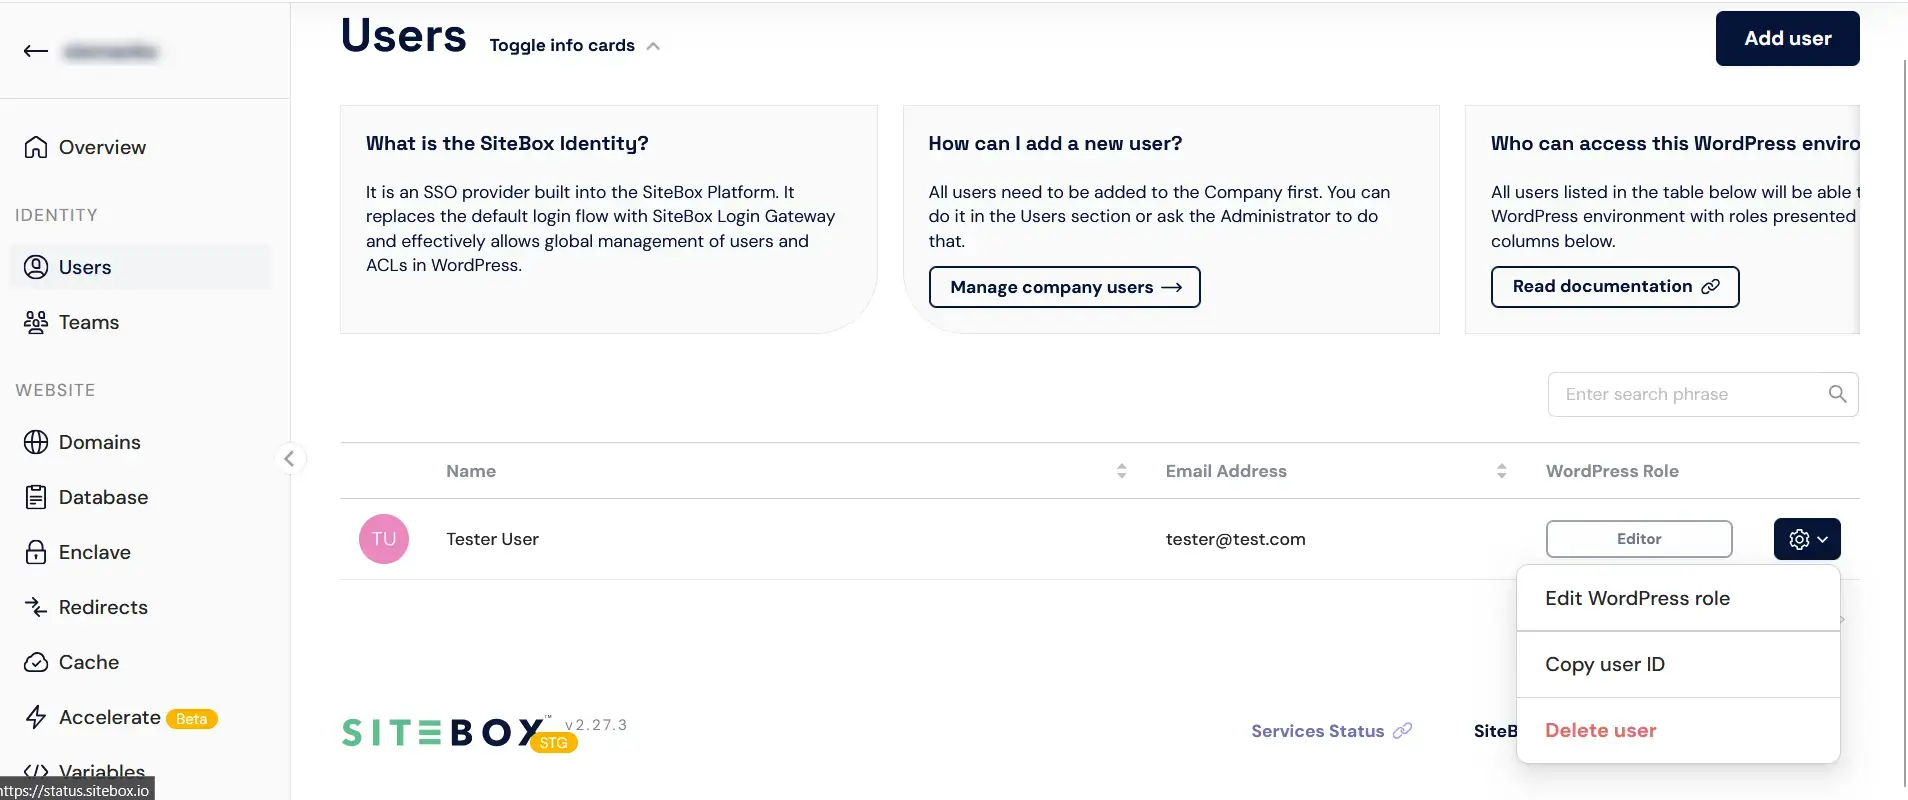
Hover your mouse over the gear-shaped icon next to the user whose WordPress role you want to modify and click on "Edit WordPress role".
-
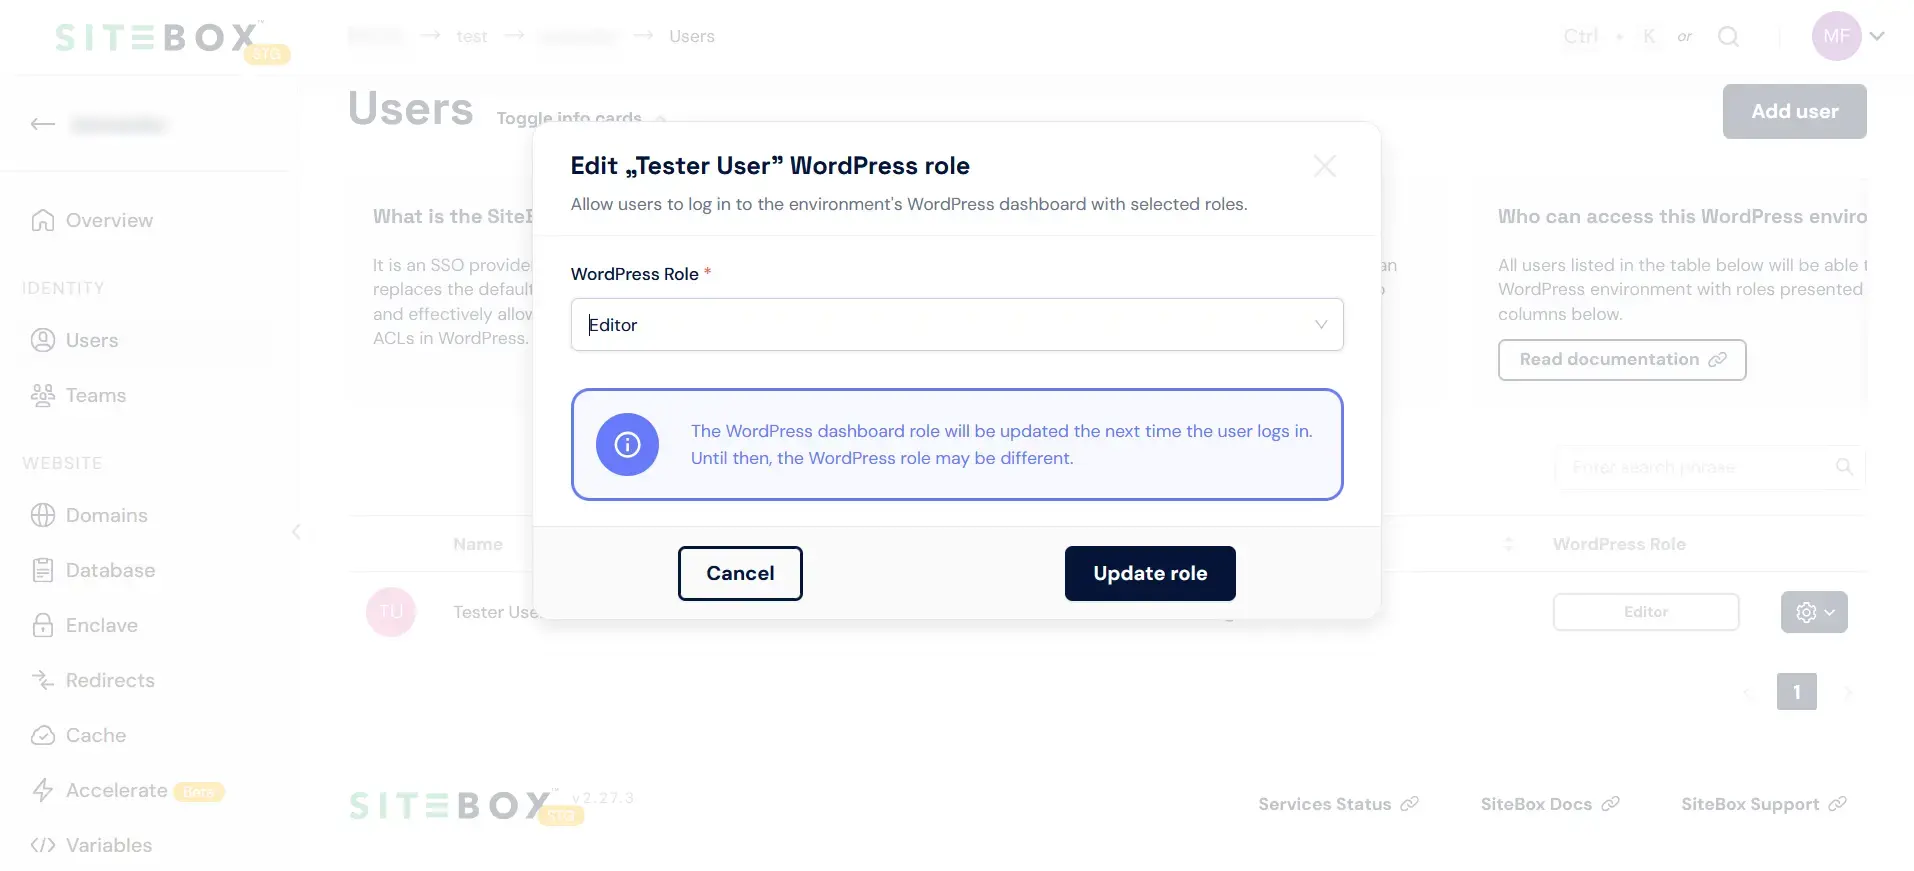
A modal window will appear, similar to the one used for adding a user. Here, you can select the user's WordPress role.
-
Finally, click "Update role" to save the changes.
How to remove the user from the Environment?
To remove a user from the environment, follow these steps:
-
Hover your mouse over the gear-shaped icon next to the user you wish to remove and click on "Delete user".

-
A popover will appear, asking you to confirm the user's removal.
-
To confirm the removal, click the "Proceed"" button.
